Micro:bit – Basic Features and Components
Before we begin the story of Micro:bit programming through MakeCode, let’s get acquainted with the basic components and features of Micro:bit and the work environment.
Micro:bit – Basic Features and Components
Micro:bit is a portable, user-programmable computer, which has a 32-bit ARM Cortex-M0 processor working on 16MHz with only 16KB RAM memory, as well as sensors and a screen made of 25 LEDs. It has connectors, five inputs and outputs (I/O) used to connect the Micro:bit to other devices or sensors, it also has Bluetooth, and it is powered by two AA batteries. Most importantly, it has the ability to program.
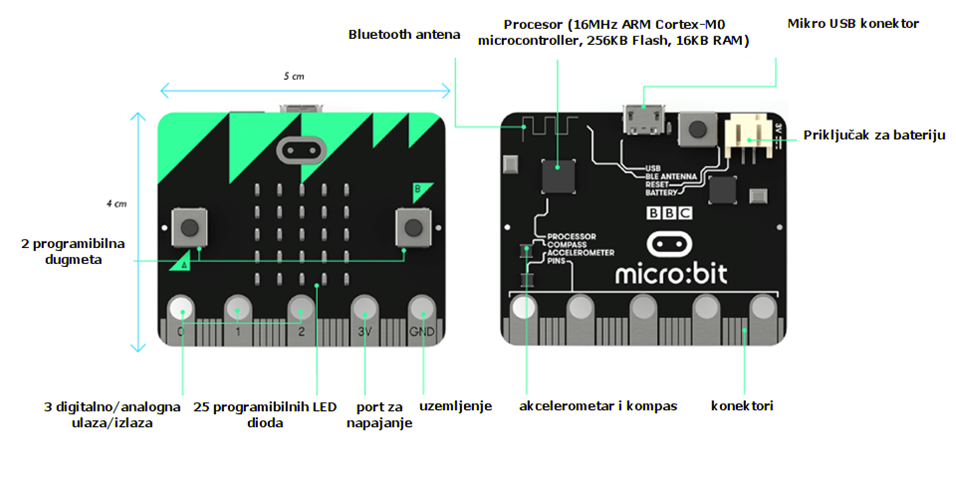
Micro:bit consists of the following physical components:
25 LEDs, which are individually programmable
2 programmable buttons labelled A and B
Connection pins
Temperature and light sensors
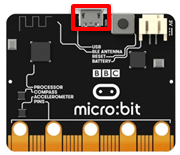
Motion sensors (accelerometer and compass)
Wireless communication via radio and Bluetooth
USB interface
Reset button
Light Emitting Diode (LED)

Light Emitting Diode (LED) is a diode, which emits light. Micro:bit has 25 LEDs (arranged in a 5x5 grid), they are individually programmable and depending on the program, they can display text, numbers and images.
A and B Buttons
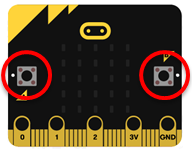
On the front of the Micro:bit device, there are two buttons (labelled A and B). Pressing each button individually or both buttons simultaneously triggers the code on the device.
Pins
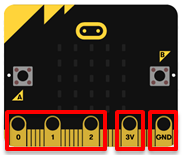
They are used to connect the Micro:bit to other devices or sensors.
Light Sensors

LEDs are located on the front of the Micro:bit. In this case, they play the part of an input device. LED screen works as a basic light sensor, which can detect the intensity of the ambient light.
Temperature Sensors

The temperature sensor allows the Micro:bit to detect the current ambient temperature, in degrees Celsius.
Accelerometer
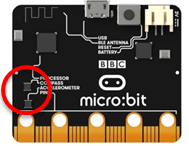
Accelerometer - is the component which registers movements, changes in speed and position, that is, it is possible to measure the speed of movement. With this component, the Micro:bit registers when it has been moved. It is also possible to detect other actions, such as shaking, tilting or free fall.
Compass
The compass detects the earth’s magnetic field, which allows us to detect which direction the Micro:bit is facing. The compass needs to be calibrated before it can be used. “Calibrating” the compass provides a precise reading of the direction. When the calibration starts, Micro:bit will display the instruction “Draw a circle” or “Tilt to fill screen”. To calibrate the compass, you will have to follow the instruction and tilt the Micro:bit in a circle to move the dot in the center of the screen until the outline of the circle is displayed or the entire screen is filled with dots.
Radio and Bluetooth

The radio component enables wireless communication between two or more Micro:bits. The radio can be used for sending messages to other Micro:bits, creating multiplayer games, quizzes, and the like. The Bluetooth Low Energy (BLE) antenna allows the Micro:bit to send and receive Bluetooth signals, i.e. to communicate wirelessly with computers, mobile phones and tablets.
USB Interface
The USB interface allows us to connect the Micro:bit to our computer by using a micro-USB cable, which will power the device and enable us to download programs to the Micro:bit.
Work Environment
We can launch the work environment through our browser by going to the https://makecode.microbit.org web page.
We can start a new project by clicking on the New Project button  .
.
This online editor provides the possibility of coding in JavaScript or block programming where commands are stacked by using the “drag and drop” technique. We will deal with the block programming.
The Micro:bit web environment in the MakeCode editor has a simulator (1) on the left side, which runs the program immediately after it has been written; therefore, through visualization, the user can easily detect errors, which can occur in the program. In the middle of the web environment there is a menu (2) where commands are arranged in groups. On the right side, there is a work area (3) where you can drag commands and construct programs.
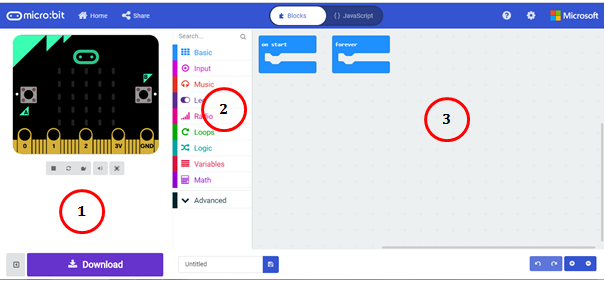
When a new project is started, two blocks appear on the MakeCode work surface: on start and forever. The 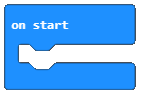 block is one of the blocks from the Basic category, and blocks that are placed in it are executed only once during the running of the program. While the block
 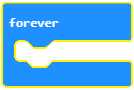 is a block within which commands will be executed an infinite number of times. The running of this block never stops on its own. It will be terminated when the user clicks the program stop button (
 ).
In MakeCode, programs are made up of various connected blocks. The blocks (commands) are divided into categories, which have different purposes.
).
In MakeCode, programs are made up of various connected blocks. The blocks (commands) are divided into categories, which have different purposes.
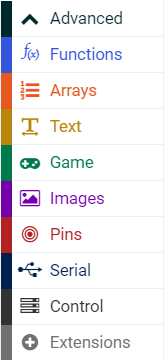
The name of the category (e.g. Music) indicates to the user which type of commands (blocks) is included in that specific category. All blocks belonging to one category are the same color.
Each block is dragged to the work surface and connected to other blocks in a manner defined by the program, which is being created.
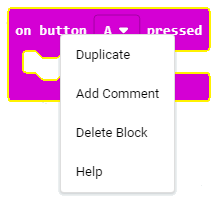
Right-clicking on a block opens a drop-down menu containing the option which allows you to create duplicates (Duplicate), add comments (Add Comment), delete blocks (Delete Block), as well as the option with which you can open the information section for additional help regarding certain blocks (Help).
Before we start creating interesting projects using Micro:bit devices, we will try to get acquainted with the basics of programming in the MakeCode work environment.
- Blocks from the Basic Category
- Working with Blocks from the Input Category
- Blocks from the Music Category
- Working with Blocks from the Led Category
- Working with Blocks from the Math and Variables Categories
- Working with Blocks from the Logic Category
- Working with Blocks from the Loops Category
- Working with Blocks from the Radio Category
Projects
In the following tutorials, we will introduce some interesting projects related to Micro:bit programming by using the MakeCode platform. All projects are done step by step, so everyone can do them again. All procedures for constructing projects are elaborated, from how the device is built to how the program is created and tested.