
Project Task - the House Alarm
Alarms are devices that communicate with the central control unit via an electronic network and send signals about possible movements and changes, which are detected by sensors.
A typical home alarm system contains the following components:
The control panel, which is actually the central control unit of the alarm system
Sensors on doors, windows or some pieces of furniture
Motion sensors, internal and external
A very loud siren or alarm.
The principle of operation is very simple: alarm systems secure entry points, i.e. places that allow access to a home, apartment or workspace, by using sensors, which communicate with the main control unit. Sensors are usually located on doors or windows, but also on other openings that allow access inside.
The House Alarm device should detect motion, as well as temperature and light level changes in the given room. If the door opens and the room temperature or the light intensity rises, the device will make a sound.
To make the House Alarm, we will need:
3 Micro:bits
adhesive tape
speaker or headphones
Crocodile clips
To create the House Alarm device, first, we will have to make the actual (physical) device composed of the Micro:bit, which will serve as a motion sensor, the Micro:bit which will detect the change in room temperature and light level, and the Micro:bit which will make a sound when changes are detected (the Micro:bit connected to speakers or headphones must be placed about 10 meters from the sensor).
Now that we have made the House Alarm device, we need to create programs for each Micro:bit.
We need to program each Micro:bit separately:
1. The first has to detect movement. 2. The second detects changes in temperature and light level. 3. The third produces a sound when movement, changes in temperature or light level are detected in the room.
Step 1
Go to https://makecode.microbit.org/.
First, we will program the Micro:bit that serves as the motion detector.
Step 2
Create a new project.
Now, we want to program motion detection; more specifically, we want to register motion using the Micro:bit.
When we want to establish communication (to use radio communication) between Micro:bits, all included Micro:bits must belong to the same group, i.e. the must use the same group ID.
Step 3
By creating the group ID, we actually create a space where the devices will communicate.
To create an ID group, we need to drag the block 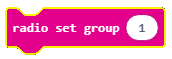 from the category
  into the block
  from the category
  . Into the space
  we type the desired number for the group ID. This can be any number. We will leave the number 1. This way, we have created the group with the ID 1 in which all Micro:bits will communicate.
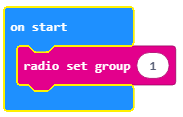
The part of the code, which creates the group for communication:
Step 4
Drag the block 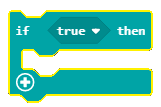 from the category
  into the block
 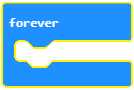 , located in the category .
Into the condition input field  drag the block
  (located in the category
  ).
).
From the drop-down list of the block :
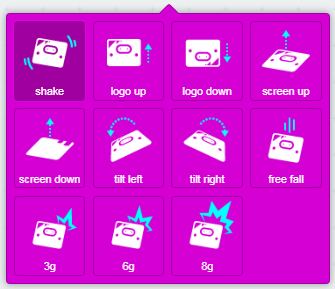
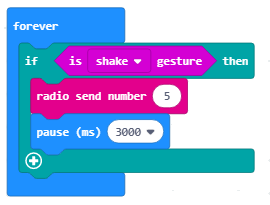
choose the option  . This option detects movements.

Based on the setup of the task, when a movement is registered (or in our case when the conditions are fulfilled), the Micro:bit will send a certain value by using the block 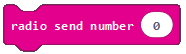 .
.
We will put the number 5 into the input field  (any value can be entered). For the sensor to react, i.e. detect movement, we need to set it so it takes a certain amount of time, let’s put 3 seconds (or 3000 milliseconds). For this, we will use the block
 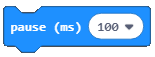 from the category . Into the input field
  we will put 3000ms, which will be the sensor response time, with regard to the change that has occurred.
Step 5
Download the .hex file to your computer by clicking on the button  . The Micro:bit will be ready to start working once you have dragged the file onto it.
Step 6
Now, we have to program the second Micro:bit to detect the changes in temperature and light level, and to send that information to the Micro:bit, which will react to this by making a sound. In order for the Micro:bits to communicate, they have to belong to the same ID group.
We have already created the group with the ID 1 where all of our Micro:bits will communicate:
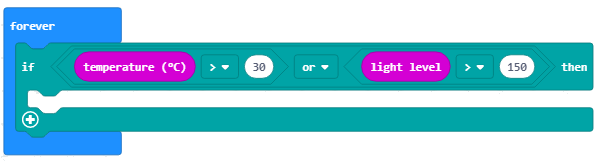
Drag the block form the category into the block . We also need to drag the blocks that define the conditions into the condition input field . One condition will be that the temperature is higher than 30 degrees, and the other condition will be that the light level is higher than 150.
Conditions can be complex (created by connecting simple conditions).
In our case, the simple conditions are that the temperature is higher than 30, or that the light level is higher than 150.
We define our simple conditions with the block  .
.
In our case, we define the conditions as follows:
temperature
 higher than 30:
  .
.light level
 higher than 150:
  .
.
You use logical (boolean) operators to connect simple conditions (AND, OR, NOT).
In MakeCode, logical (boolean) operators are represented as follows:
 - Connects two conditions, and it returns True as the result only if both conditions are True.
 - Connects two conditions, and it returns True as the result if at least one condition is True.
 - It is placed in front of one condition, and it returns True as the result in case the condition is not fulfilled.
The condition, which checks whether there has been a change in temperature or light level, is defined by the following block:

The look of the conditional block:
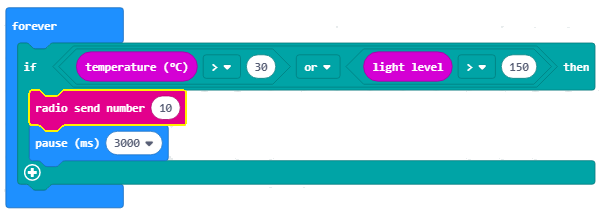
Based on the setup of the task, when the change in temperature or light level has been registered, the Micro:bit will send a certain value by using the block . We will put number 10 into the input field (any value can be entered). For the sensor to react, i.e. detect changes, we need to set it so it takes a certain amount of time, let’s put 3 seconds (or 3000 milliseconds). For this, we will use the block from the category . Into the input field we will put 3000ms, which will be the sensor response time, with regard to the change which has occurred.
The look of the program when a change in temperature or light level is detected:
Step 7
Download the .hex file to your computer by clicking on the button . The Micro:bit will be ready to start working once you have dragged the file onto it.
Step 8
Finally, we need to program the third Micro:bit. This Micro:bit will make a loud sound when it receives certain information from the other two Micro:bits.
We will create a group with ID 1:
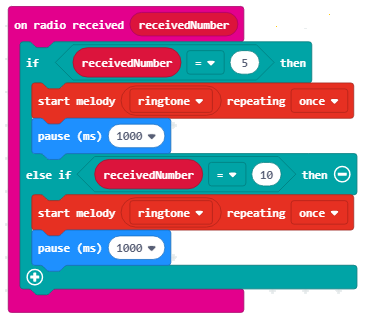
The next step is for this Micro:bit to receive information (in our case a number) on the basis of which it will “respond” by making a sound. To achieve this, we will drag the following block from the category :
Into it, we will drag the block . Into the condition input field we need to drag the condition, which will check the numbers (5, 10) received from the other two Micro:bits.
Using the  sign, we will introduce one more condition. Into the branch with the condition
  and into the branch with the condition
  , we will drag the block
  (from the drop-down list of this block we will choose the melody
 ringtone) from the category  , which is used for producing sound.
In addition to this block, we will also add a time interval of one second.
, which is used for producing sound.
In addition to this block, we will also add a time interval of one second.
The final look of the code:
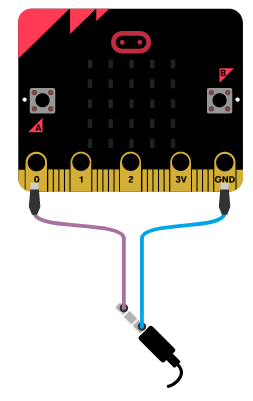
Note: The Micro:bit has to be connected to speakers or headphones, as shown in the figure below, for the sound to be reproduced:
Step 9
Download the .hex file to your computer by clicking on the button . The Micro:bit will be ready to start working once you have dragged the file onto it.