
EV3 – Basic Characteristics and Components
Before we start talking about programming Mindstorm Lego EV3 robots by using the MakeCode online platform, let us first learn about the basic characteristics of the EV3 robots and the MakeCode interface.
The Basics of LEGO EV3 Robots - hardware
The LEGO Mindstorms EV3 set is composed of a variety of mechanical and electrical parts from which robots of various shapes and purposes can be assembled.

A robot needs have sensors, which collect information from its environment (the robot’s senses), a processor which analyzes this information, i.e. thinks (the robot’s brain), mechanical parts that move and perform a certain activity, as well as a power source, which provides the energy for specific parts of the robot and breathes life into it.
The main parts of the robot are:
Control unit
Power source
Ports
Servo Motors
Sensors
Control Unit (EV3 Brick)
At first glance, it becomes obvious that the central part of the robot is occupied by the square EV3 unit where the processor is located. It is connected to the sensors, from which it receives and processes information, via cable and ports. Based on the parameters that we set in programs we create, it can send control signals to mechanical parts, i.e. motors, and it can also issue certain audible warnings. The communication between the computer and the control unit is established either via Bluetooth or a USB cable.
In fact, the robot’s operation is controlled by two programmable AVR microcontrollers. These are devices that, in addition to the processor, contain some peripherals, such as memory, timers, A/D converters, so they can be programmed several times.
Of course, this integration is done at the expense of memory reduction over the standard computer processor, so programs have to be deleted frequently in order for the user to download new ones.
The following figure shows the control unit along with the screen through which we control the operations performed on the robot.
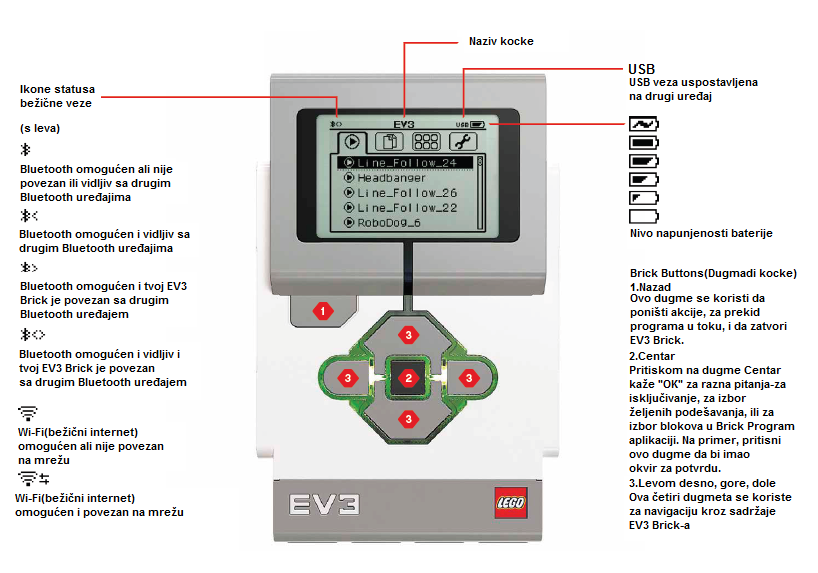
To turn on the EV3 Brick, the user needs to press the button in the center. When the button is pressed, the cube light will be red, and the home screen will appear.
When the light changes to green, the EV3 Brick is ready to go. To turn off the EV3 cube, you need to press the back button until the power off screen appears. By clicking on the confirmation sign and pressing the button in the center, the EV3 cube will shut down. In case you select the X option, you will return to the Run Recent screen.
Power Source
Like any electro-mechanical construction, the LEGO Mindstorms EV3 robot requires power. The standard LEGO robot power supply is composed of 6 AA 1.5V batteries. Electric motors are powered by 9V, and one of the microcontrollers and some of the integrated circuits are powered by 5V. The main microcontroller is powered by 3.3V. The output ports are powered by 4.3V and have overcurrent protection.
Newer versions of the robot have rechargeable batteries like mobile phones. Energy can be obtained from solar cells that the robot can carry, as well as from the city grid if the robot doesn’t move.
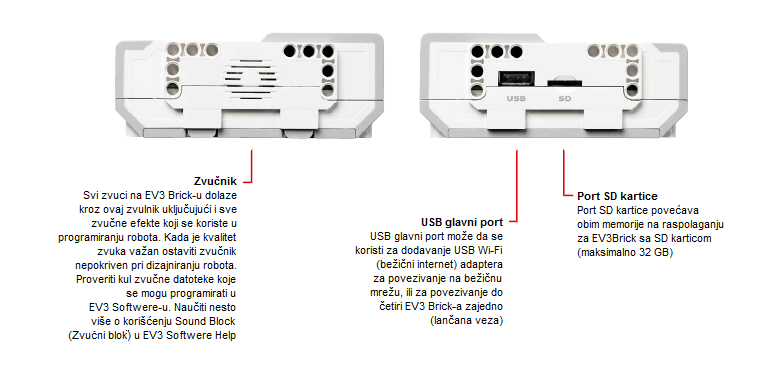
Ports
We have already mentioned that the control unit receives data from the environment through sensors, processes them, and then transmits corresponding control signals to the motors. Communication with peripheral devices is done through ports.
According to the data direction, the ports can be divided into input and output ports. There are 4 ports each.
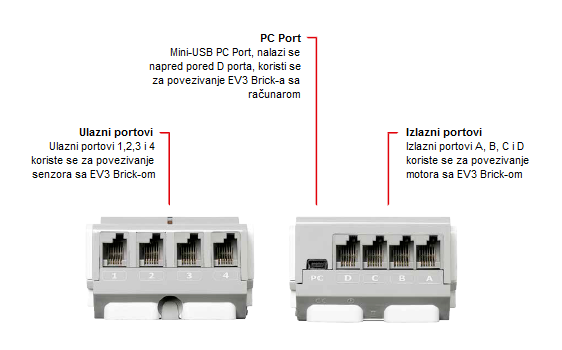
The output unit is composed of motors, and the input unit is composed of sensors. Unless the user changes something while writing the program, by default the output ports are divided and used as follows:
port A for medium motors
port B and C for two combined large motors
port D for one large motor
Also, unless the user defines otherwise, by default the input ports are assigned as follows:
port 1 for the touch sensor
port 2 for the temperature sensor or the gyro sensor (gyroscope)
port 3 for the color sensor (lighting)
port 4 for the detection of infrared light or ultrasonic sensor
Motors
Any kind of movement made by the robot would be unimaginable without the motors. Most often, there are three servo motors available, these motors receive electrical signals through their ports, which enable them to function. Servo motors are most commonly used when small forces have to be overcome, such as opening small doors, carrying loads of small dimensions over short distances, and the like. That is why they are mostly used for making small robots, robotic arms and other manipulators. Servo motors do not require a strong power supply, they are easy to control, and they are reliable.

The basis of a servo motor is actually a one-way motor with a certain number of gears, and their operation is based on the principle of pulse width modulation - PWM. The microcontroller processes the data on the PWM signal fill factor (number from 0 to 100, and from 0 to -100), and based on that number the duration percentage of the PWM signal is determined.
Positive numbers refer to moving forward and negative to moving backwards. In addition to the obvious size difference, motors vary in the number of RPM (rotations per minute). The larger engine is slower but provides more power.
The medium motor is faster and more stable. It contains tachographs, which provide information about the number of rotations and various other useful data.

With the proper construction layout and program usability, you can create different mechanisms for movement with which the robot can move by using wheels and caterpillars; it can jump like a frog, move like a scorpion, as well as catch and push objects, and place them in specific spots.
Sensors
Like humans, robots need senses to analyze their environment.
The standard LEGO robot has four types of sensors:
ultrasonic (the one that looks like eyes), which is used to determine the distance between the robot and an obstacle,
optical (color sensor), which, as it is implied by the name, reacts to the light level in its environment, i.e. detects the color as a value of the electromagnetic spectrum,
sound sensor, which reacts to the sound level in its environment; touch sensor, which, you guessed it, reacts to touch, i.e. to the button being pressed,
gyro sensor (gyroscope), measures the object’s (robot’s) rotational motion and changes in its orientation.
Ultrasonic Sensor
This is a digital sensor, which measures the distance to an object.
In addition to the ultrasound receiver, which is a kind of a special microphone, this sensor also has an ultrasound transmitter. The transmitter sends an ultrasonic wave that bounces off the obstacle and reflects back to the robot. This returning wave is picked up by the receiver, which is the actual sensor. The robot calculates the distance to an obstacle by measuring the time elapsed from the moment the ultrasonic wave was emitted until the echo of this wave, which has reflected back from an object, came back.

The distance can be measured in inches or centimeters. When the centimeter sale is used, the measurable distance is between 3 and 250cm, with the accuracy of +/- 1cm. When inches are used, the measurable distance is between 1 and 99 inches, with the accuracy of +/- 0.394 inches). The speed of the ultrasound is about 300 m/s, and the sound wave travels from the transmitter to the obstacle and back, crossing the distance that is double the distance from the robot to the obstacle. The processor just needs to use the formula s=v*t, to calculate the distance from the obstacle.
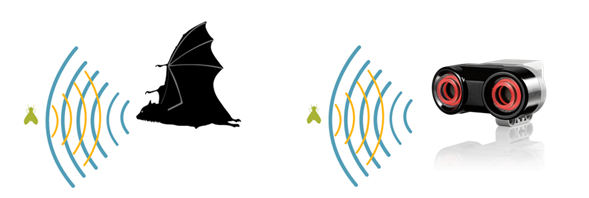
For a more accurate measurement, other aspects have to be taken into account, like the fact that the speed of the ultrasound in the air depends on the ambient temperature and on the frequency of ultrasound emitted by the transmitter associated with the sensor. It is not difficult to see that this feature reminds us of a bat that, although with a scarce sense of sight, is unmistakably orientated in space thanks to its echo locators.
Optical Sensor
The Color Sensor is a digital sensor that can detect the color or intensity of light that enters through the small window on the face of the sensor. It reads 1 kHz/sec.

This sensor reacts to light or changes in ambient light. Previously, the sensors were black and white, and they could recognize some shades of grey. Nowadays, sensors are more complex and they can recognize color, i.e. the level in the electromagnetic spectrum. This is why they are often referred to as color sensors. Human beings (unlike animals) have a developed sense of sight thanks to a highly developed brain, which is able to receive and process a large amount of information, which results in image recognition.
The sensor can be used for:
Reading colors: the robot recognizes seven colors (black, blue, green, yellow, red, white, brown and plus no color). For example, the robot can be programmed to sort colored blocks, say the names of colors it recognizes, or stop action when it recognizes red.
Reflecting light: the robot uses a lamp to emit red light and measures the intensity of light reflected off the object. It uses a scale from 0 (very dark) to 100 (very light). For example, the robot can be programmed to move around on the white surface until it comes across a black surface.
Ambient light (environment): the robot measures the strength of light received from the environment, for example, the light coming from a lamp. It uses the same scale as in the second option. For example, the robot can be programmed to set off a wake-up alarm when the Sun rises.
There are clear limitations when it comes to sensors, i.e. robots; therefore, orienting in space based on images in the form of a large number of dots is difficult. That is why this sensor, and the communication through it, is a big challenge for constructors.
Touch Sensor

This is actually a switch, which has two conditions:
pressed (when the robot touches an obstacle) or
released (when the sensor is not touching any object).
Gyroscope
Gyroscope is a digital sensor, which detects movement and changes in the movement of the robot. When the robot moves, this sensor will present this as the change in the rotation speed in degrees per second (deg/s). The maximum rate is 440 deg/s.

Based on this data, the user can determine whether the robot is turning, and also to program these turns (with the accuracy of +/- 3 degrees for a 90-degree turn). In order for the sensor to produce accurate results, it is necessary to keep the robot motionless before turning it on, so the sensor can properly calibrate.
Apart from the ones mentioned above, there are other types of sensors available, such as sound sensor, temperature sensor, infrared sensor, etc.
The Main Menu of the EV3
EV3 Brick contains four basic screens, which give you access to a wide range of functions unique to the EV3 Brick (from something as simple as starting and stopping a program, to writing the program itself).
Run Recent
A list of downloaded and running programs will be displayed on this screen. The program at the top of the list is the program that was last used.
File Navigation
From this screen, the user can access and manage all files on EV3 Brick, including files stored on SD cards.
Applications
EV3 Brick comes with four applications. Apart from that, the user can create his/her own applications by using the EV3 Software.
Port View
On the first screen on the Port View, the user can see which ports have sensors and motors attached, that is, which ports are occupied. By using the EV3 Brick navigation buttons, the user can check which ports are occupied and see the current readings from the sensors and motors.
Motor Control
The user can control the movement of any motor connected to one of four output ports.
IR Control (Infrared control)
Controls the movement of any motor connected to one of the four output ports by using the “remote control” - Remote Infrared Beacon, and the “receiver” - Infrared Sensor.
Brick Program
EV3 Brick comes with an on-brick application similar to a software that would be installed on a computer. This way simple programs can be created, which is why it is suitable for beginners. Another reason is that the user can create and test programs on the robot itself without using a computer.
Brick Dialog
Reading the values of sensors and motors. If sensors and motors are connected to the brick, a graph will show current readings from one of the sensors or motors, similar to an oscilloscope.
Settings
This screen enables the access to various general settings on the EV3 Brick, such as the volume of the sound, establishing Bluetooth or Wi-Fi connections, visibility or technical specifications for the EV3 Brick itself. Screen and volume settings, as well as sleep settings, i.e. inactive time that passes before the unit goes into sleep mode.
Interface – Software
For more demanding applications, more advanced programs and development environments are used, which offer great opportunities for program creation. Due to their increasing popularity and application, programmers have developed (and are still developing) multiple classes in popular programming languages like C#, MatLab, and others, specifically for creating applications which control LEGO robots. It is up to the users to choose whether they will stack blocks or write a program as a series of instructions in one of the programming languages.
In this part of the course, we will address the possibilities MakeCode development platform. In this programming interface, you can create simple programs like “Go right for 5 seconds and stop”, and you can also let your imagination run wild and create more complex programs by involving different sensors and motors.
When we access the MakeCode programming interface (https://makecode.mindstorms.com/),
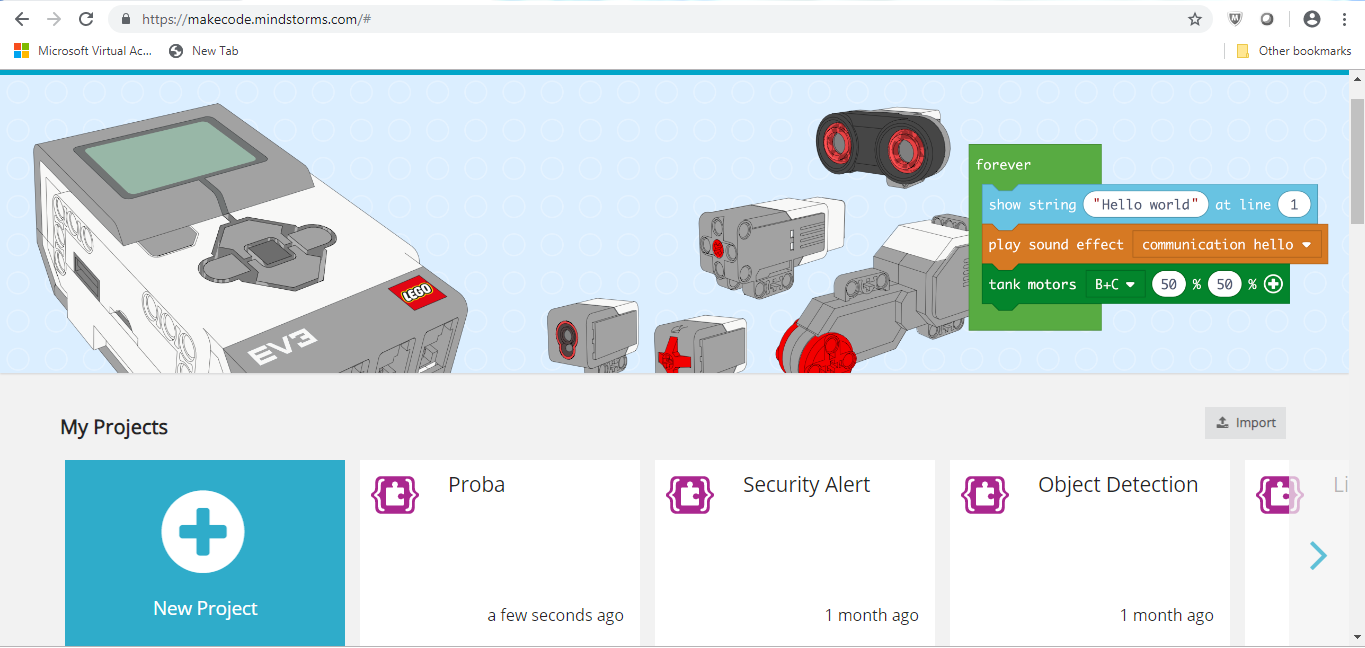
as with most programs, we notice that we are expected to create a new project ( ) or to open an already existing program. To learn more about the EV3 programming interface, and to learn how to create the first program, you can use the Getting Started options or watch various Tutorials.
By clicking on the button or by opening one of the existing projects, you can access the programming interface, which contains blocks that you can use to control the robots.
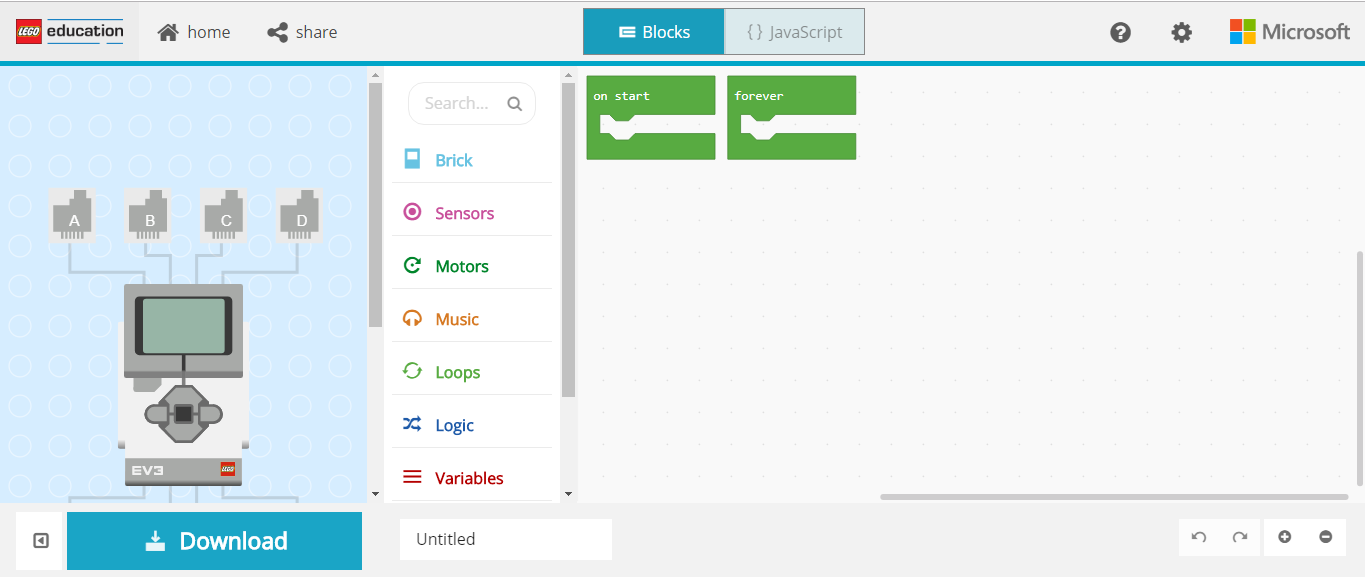
All programming blocks used to control the robot are located in the block palette in the middle of the programming interface. Program blocks are divided into categories by type and purpose. The advantage of this interface is the existence of a robot simulation.
Projects
In the following tutorials, we will introduce some interesting projects for programming EV3 robots by using the MakeCode platform. All projects are done step by step, so everyone can do them again. All procedures for constructing projects are elaborated, from how the program is created to how it’s tested.