Visual Programming Language Scratch
Scratch is a visual programming language made for children. Programming in Scratch does not require writing commands. To create a program you can just arrange the blocks in the proper order (similar to puzzles or LEGOs).
- The result of the program, which contains only one command
 looks like this:
  .
.
There are two ways we can use Scratch (version 3):
by downloading the installation file from https://scratch.mit.edu/download and installing it on your personal digital device (desktop version of the program);
by working online on the website https://scratch.mit.edu (the online version of the program).
Both ways have their advantages and disadvantages.
If we install the desktop version on our personal digital device, we will work faster and more comfortable, primarily because we won’t depend on the quality of our Internet connection, or on the occasional maintenance of the Scratch online platform (which is then unavailable).
If we are programming using the Scratch online platform, we need to create our personal account. With having the account comes the ability to save our projects on the online platform and access them from any device connected to the Internet. In addition to this convenience, the Scratch online platform offers you the possibility of keeping parts of your programs in the Backpack and use them again when you need them. An additional advantage is the ability to publish programs. After publishing, your program becomes visible to other Scratch users; we call them Scratchers. Just like they can see and remix (adapt) your programs (projects), you can also see and remix theirs. You can also ask for help on the platform. Helping other Scratchers is in the spirit of this online community.
The user interface of the two different versions of Scratch look almost identical; however, the online version has all the elements of the installed version and some other functionalities. On this page, we will show the elements of the Scratch online platform.
Scratch Online Platform
Programs that are created on the Scratch online platform are called projects. Projects are created by clicking on the button Create. This will open the user interface, which looks like this:
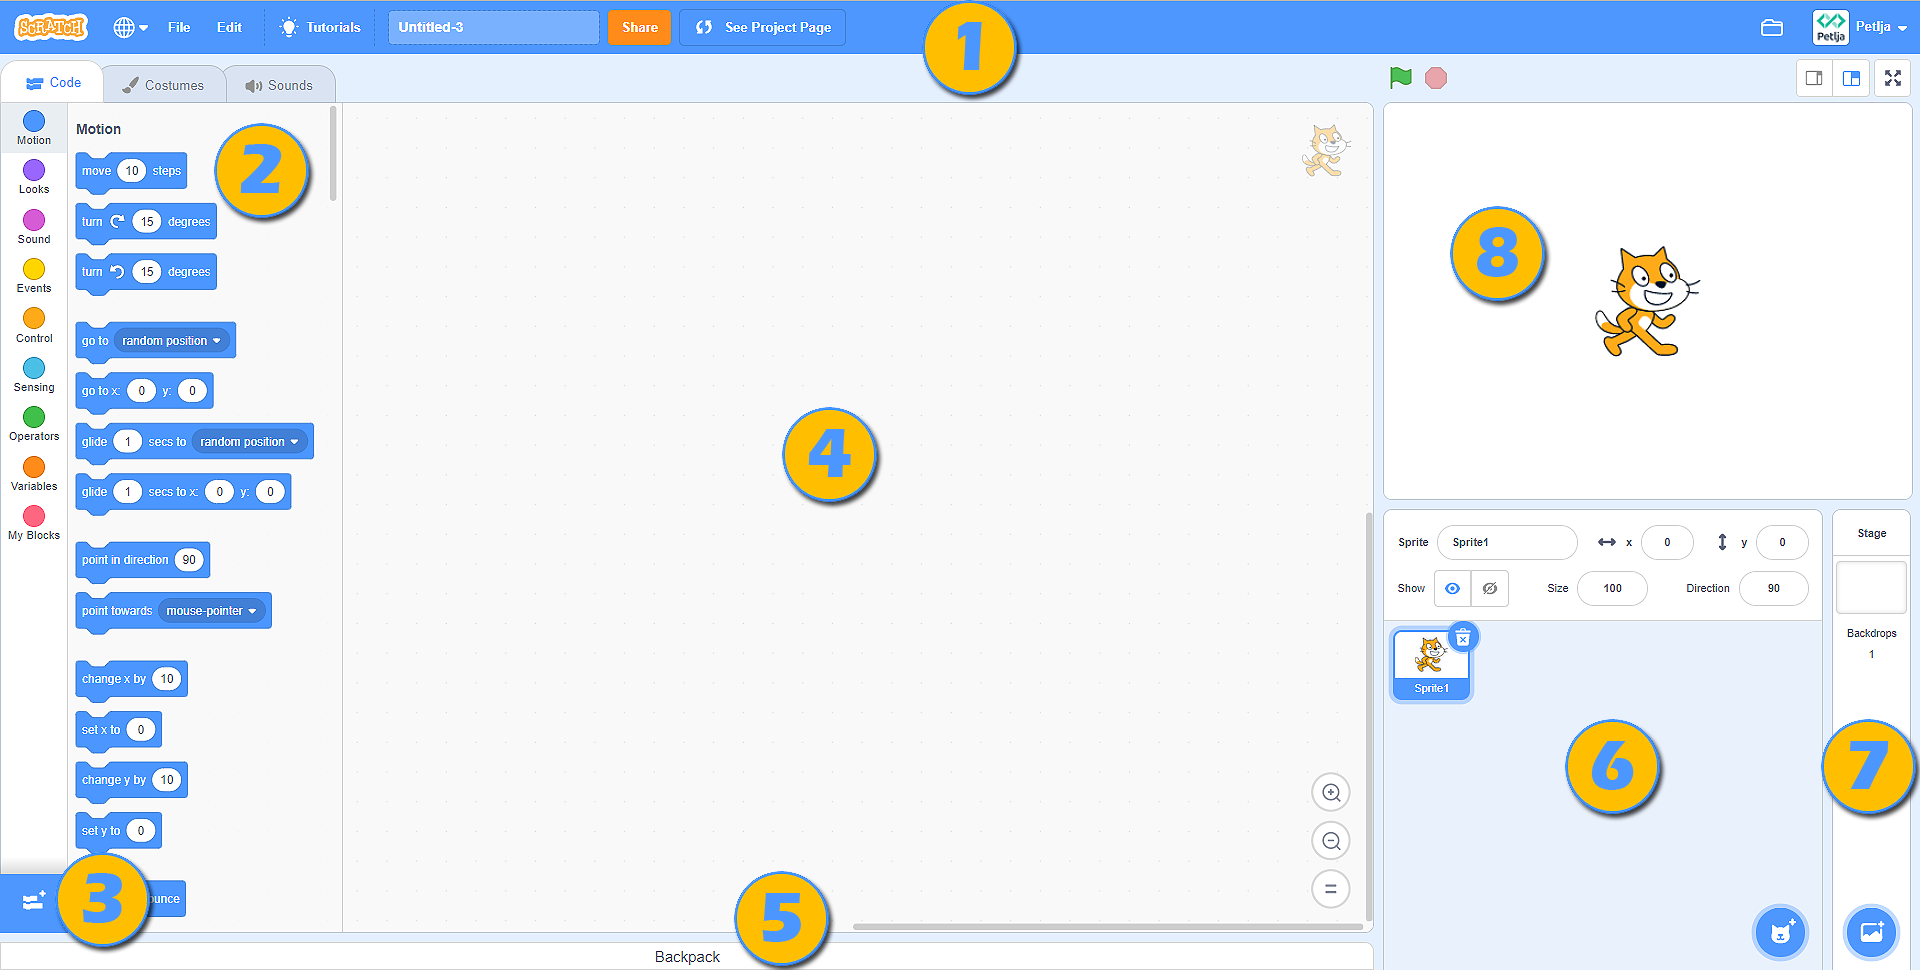
Menu bar;
Tabs Code, Costumes and Sounds;
Selection of block categories which can be added to the work surface;
Space where we can create our programs (stack our blocks), which relate to the active sprite (character) or the stage;
Backpack;
The Sprite list with basic parameters (characteristics) - the active sprite is marked by a blue frame around its thumbnail;
The list of stage backdrops;
The stage.
 The interface header is occupied by the Menu bar.

Clicking on Scratch will open the account page of the user who is currently logged in (in our case this would be the Loop account page). Within this page, you can see relevant notifications, news, project proposals of other Scratchers, as well as all messages received (Messages), and programs made by the owner of the account (My Stuff).
Clicking on the Earth icon will open a drop-down list from which we can choose the language in which all the elements of the user interface will be displayed;
File offers several important options: starting a new project (New), saving a project (Save now), saving a project as a copy of an already existing one (Save as a copy), loading a program from your personal computer (Load from your computer) and downloading the project to your personal computer (Save to your computer);
Edit allows us to restore a deleted sprite with all its blocks (Restore), as well as to turn on the turbo mode for running the program (Turn on turbo mode). If we don’t want the program to run quickly, we can just turn off the turbo mode (Turn off turbo mode);
Clicking on Tutorials will open a page where we can select one of the instructions on how to create programs in Scratch;
In this field we will enter the name of the project;
Clicking the Share button will make our project publicly available to other Scratchers. This is when the page for that particular project is created;
See project page takes us to our project’s page where we need to enter: instructions on how to use the program (Instructions), and notes and information about the creators (Notes and credits). On this page we can run of the program, as well as go back to the programming environment, by clicking on the See inside button.
Clicking on the file icon (My Stuff) will open the page with all the programs created by the user who is logged in.
The central part of the user interface is occupied by tabs Code, Costumes and Sounds.
The Code tab contains categories of commands with listed blocks, which belong to them (the color of the block corresponds to the color of the category it belongs to). These blocks are related to the active sprite and the programming space in which the blocks are placed by dragging and dropping them on the surface;
The Costumes tab contains the editor with tools for adding, deleting, and adapting costumes belonging to the active sprite;
The Sounds tab contains the editor with tools for adding, deleting, playing, and basic processing of audio recordings.
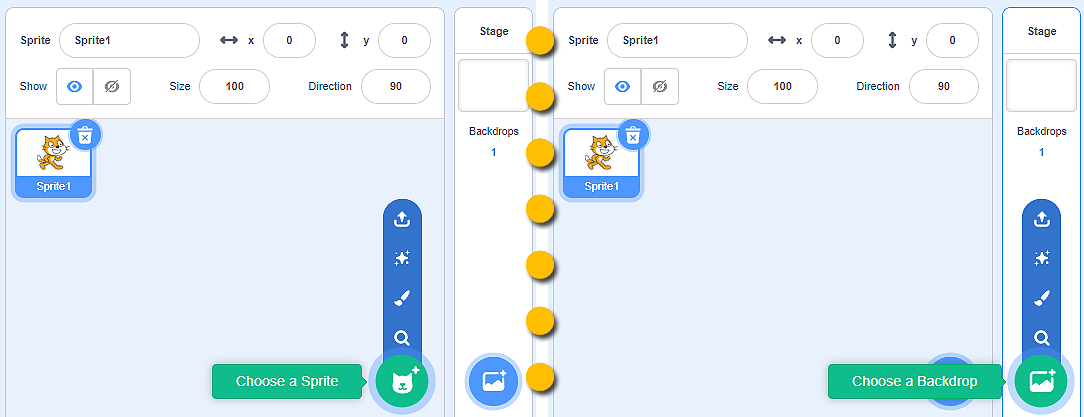
The lower right corner of the stage is reserved for adding/deleting sprites and stage backdrops. The sprites and the stage backdrops can be added from the Sprite/Backdrop library Choose a Sprite/Backdrop, we can draw them Paint, we can let Scratch surprise us and choose for us a sprite/backdrop Surprise, as well as upload them from our personal computer Upload Sprite/Backdrop.
The Stage is the space within which the program is being executed. It is 480 steps (pixels) wide and 360 steps (pixels) high. The position of a sprite is determined with two values x: and y:.
The value x: determines the position of a sprite along the width of the stage (left or right);
The value y: determines the position of a sprite along the height of the stage (up or down);
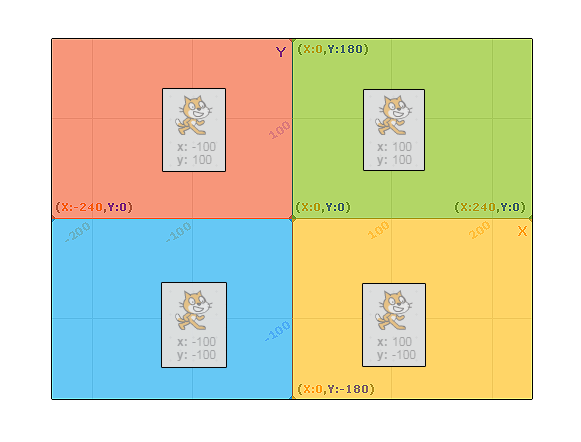
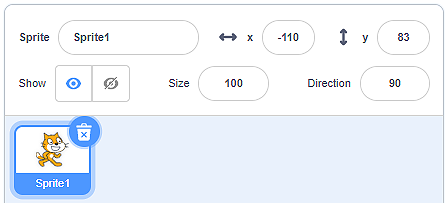
Therefore, the values of x: and y: depend on the location of the sprite. If we want our sprite to be in the center of the stage, the values should be: x: 0 and y: 0. The information on the current location of the sprite can be seen in the sprites list, within sprite’s parameters.
- In the upper left part of the stage.
- Well done! You understand perfectly how the values of X: and Y: determine the position of the sprite on the stage!
- In the lower left part of the stage.
- Study the figure where we divided the stage into four parts and painted them with different colors. You will notice that in the green part of the stage the values are X > 0 and Y > 0; in the red part of the stage the values are X < 0 and Y > 0; in the blue part of the stage the value are X < 0 and Y < 0; in the yellow part of the stage the values are X > 0 and Y < 0. Are you now able to answer our question correctly?
- In the upper right part of the stage.
- Study the figure where we divided the stage into four parts and painted them with different colors. You will notice that in the green part of the stage the values are X > 0 and Y > 0; in the red part of the stage the values are X < 0 and Y > 0; n the blue part of the stage the value are X < 0 and Y < 0; in the yellow part of the stage the values are X > 0 and Y < 0. Are you now able to answer our question correctly?
- In the lower right part of the stage.
- Study the figure where we divided the stage into four parts and painted them with different colors. You will notice that in the green part of the stage the values are X > 0 and Y > 0; in the red part of the stage the values are X < 0 and Y > 0; n the blue part of the stage the value are X < 0 and Y < 0; in the yellow part of the stage the values are X > 0 and Y < 0. Are you now able to answer our question correctly?
Q-10: Look carefully at the information about the position of the sprite on the stage. What is the location of the sprite?
Participating in the Scratch Online Community
Whether we created a program (project) on the online Scratch platform or by using its desktop version, we can make our program available to other people interested in programming in this visual programming language.
In both cases, we need to:
have an account on the Scratch online platform;
upload our program to the platform (programs created using the offline version of Scratch have to be uploaded to the platform: File - Load from your computer);
publish our project by clicking the button
 .
.
To enable other Scratch users to understand and use our program well, it is important that we write a detailed description on the project’s page. We can access this page by clicking on  .
.
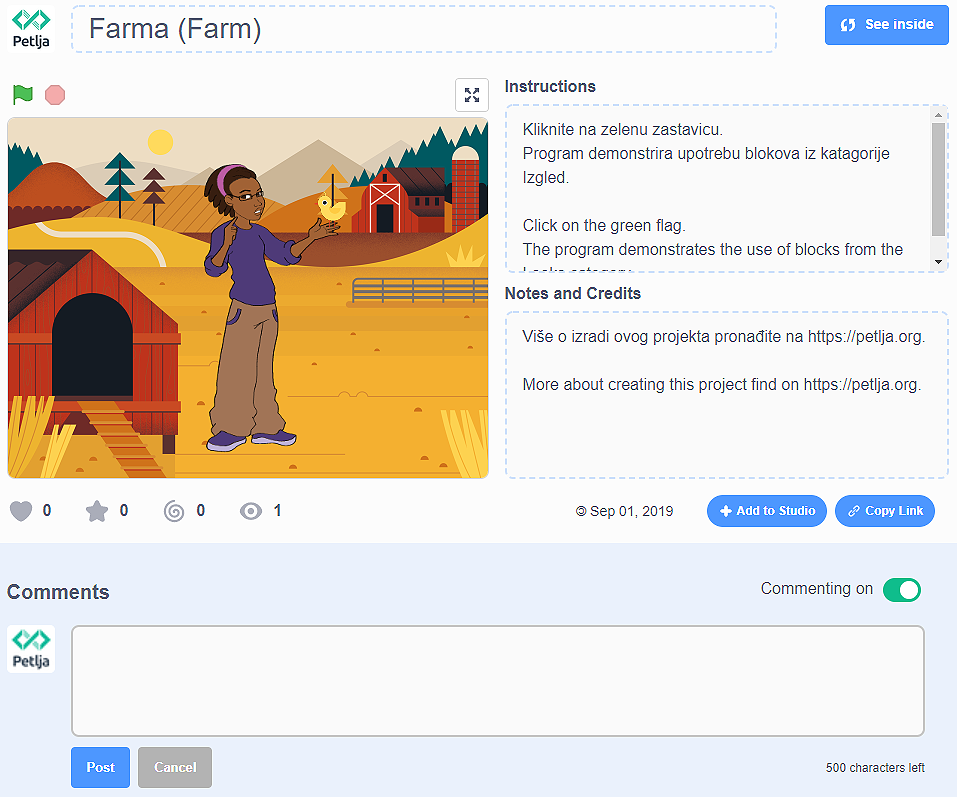
This is how other Scratch users see our project’s page:
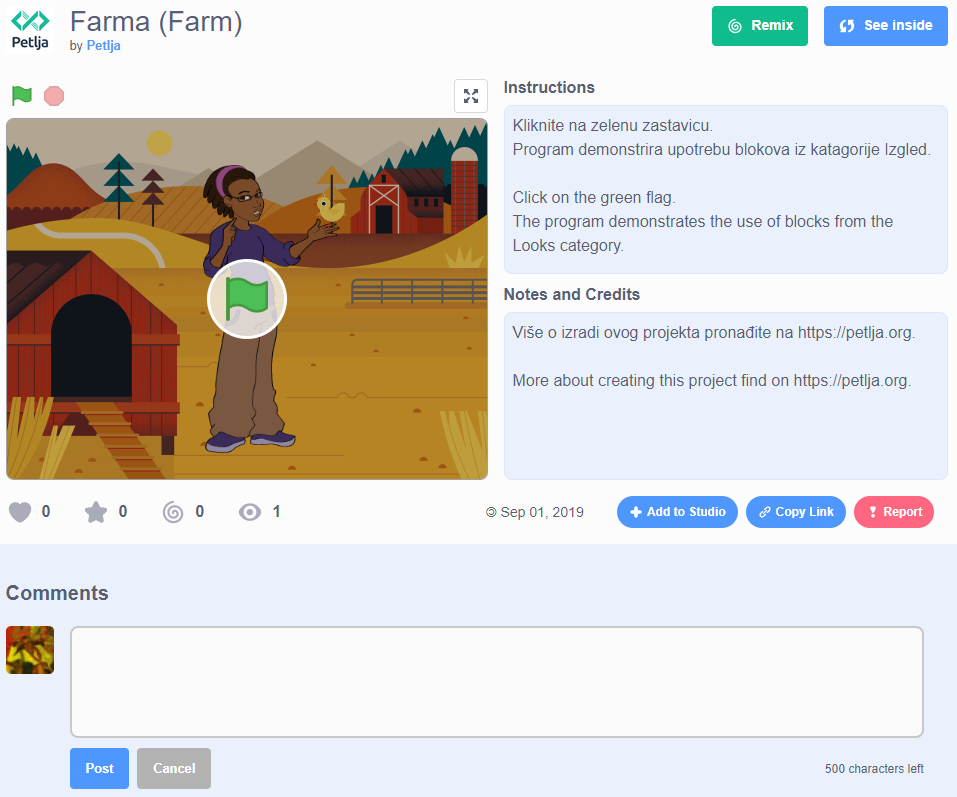
We can see that all users of the Scratch online platform can remix our project. They can just click on the button  , and upgrade, change and publish the newly created program. The information on the number of views, remixes, likes, etc. can be seen on the homepage.
The Scratch online platform is dedicated to preserving the spirit of the Scratcher community. By clicking on the button  the users can report inappropriate contents, comments, discussions, etc. After receiving a report, the Scratch team will review the problematic content, and if it does not comply with the community guidelines (https://en.scratch-wiki.info/wiki/Community_Guidelines), they will remove it from the platform.